Download Voice-Over Software for a PC & Mac

Movavi Video Editor lets you record narration, then refine the audio and export the finished video – all in one app.

As a complete video maker with voice-over capability, it brings recording, timeline editing, audio cleanup, and multi-format export into a single workspace – so you never need to switch between separate tools.

Trusted by 70 million creators worldwide

70M+

users

190+

countries

15+

updates per year

10,000+

effects to choose from

Key features of the voice-over video software

Everything you need to add a voice-over to a video – record, refine, sync, and export – in one software.

Record a voice-over while watching your video

Movavi Video Editor lets you narrate while watching the video play back in real time – so the voice-over follows the visuals naturally without manual sync work afterward. Click the Record button above the timeline, select your input device, set the volume, and start speaking. The recorded narration track appears on the timeline immediately and is ready to trim and adjust.

Trim, balance, and refine the voice track

Once recorded, the voice-over track sits on a dedicated audio layer below the video where you can trim out pauses and mistakes, adjust the clip volume, and set fade-in and fade-out to soften the start and end. If the original video has its own audio, lower it or mute it directly from the same timeline so the narration stays front and centre without competing with background sound.

Clean up background noise with AI audio denoiser

The AI audio denoiser in Movavi Video Editor scans the narration track and automatically removes background sounds – room hum, ventilation noise, keyboard clicks – without affecting the voice itself. This one-click tool is the most practical way to improve the quality of a voice-over recorded in a non-studio environment, and it runs in seconds without requiring manual EQ adjustments.

Frame-accurate sync and multi-format export

After recording and cleaning the voice-over, align the audio track with the video at the frame level by dragging it along the timeline. Export the finished video in MP4, MOV, AVI, or any other widely supported format. The free download trial gives full access to all tools; the only trial limitation is a watermark on the exported file.

Why use Movavi for voice-over video editing

Three reasons Movavi is the practical choice over standalone recording apps and online tools.

Record and edit in the same app

Most voice-over workflows involve recording in one app, exporting the audio file, importing it into a video editor, and manually syncing the two – a process that is slow and prone to alignment errors. Movavi keeps recording, editing, and syncing inside a single timeline. You record the narration in the same session where you cut the video, which means the voice-over is always in context and immediately available to adjust.

One-click audio cleanup included

Free software typically includes basic recording tools but nothing to fix the audio afterward. Movavi Video Editor includes AI noise removal, volume balancing, and audio fade controls as standard features – so a voice-over recorded in a home office sounds presentable without requiring a separate audio-editing application or professional studio treatment.

Free download on Windows and Mac

Movavi Video Editor is available as a free download for both Windows and Mac, with a 7-day trial that gives full access to all voice-over video features including recording, noise removal, and export before any payment is required. This makes it a practical solution for creators who want to evaluate the full feature set on their own projects before deciding to purchase.

How to add a voice-over to a video with Movavi – 3 steps

From a video file and a microphone to a finished narrated video in minutes.

Step 1. Download and install Movavi Video Editor

Figuring out how to add a voice-over to a video starts with getting the right tool. Install Movavi Video Editor on your computer, and open the voice-over video app. It’s available for both Windows and Mac, and you can begin with the free version to see how it fits your needs.

Step 2. Add your video and record your voice

Import your clip using Add Files and drag it onto the timeline. Then click the Record button above the timeline. In the pop-up window, select Record audio and adjust input settings if needed. Place the playhead where you want the narration to start, press record, and begin speaking. When you stop, your voice track will appear directly on the timeline.

Step 3. Adjust the sound and export your video

Listen through your project and balance the audio so your voice stays clear. If your original clip has sound, lower it or mute it to avoid overlap. When everything feels right, click Export, choose the format you need, and save your finished video.

Who uses voice-over video software

Voice-over is a fundamental component across many different types of video content.

Educators and online course creators  ·  EDUCATION

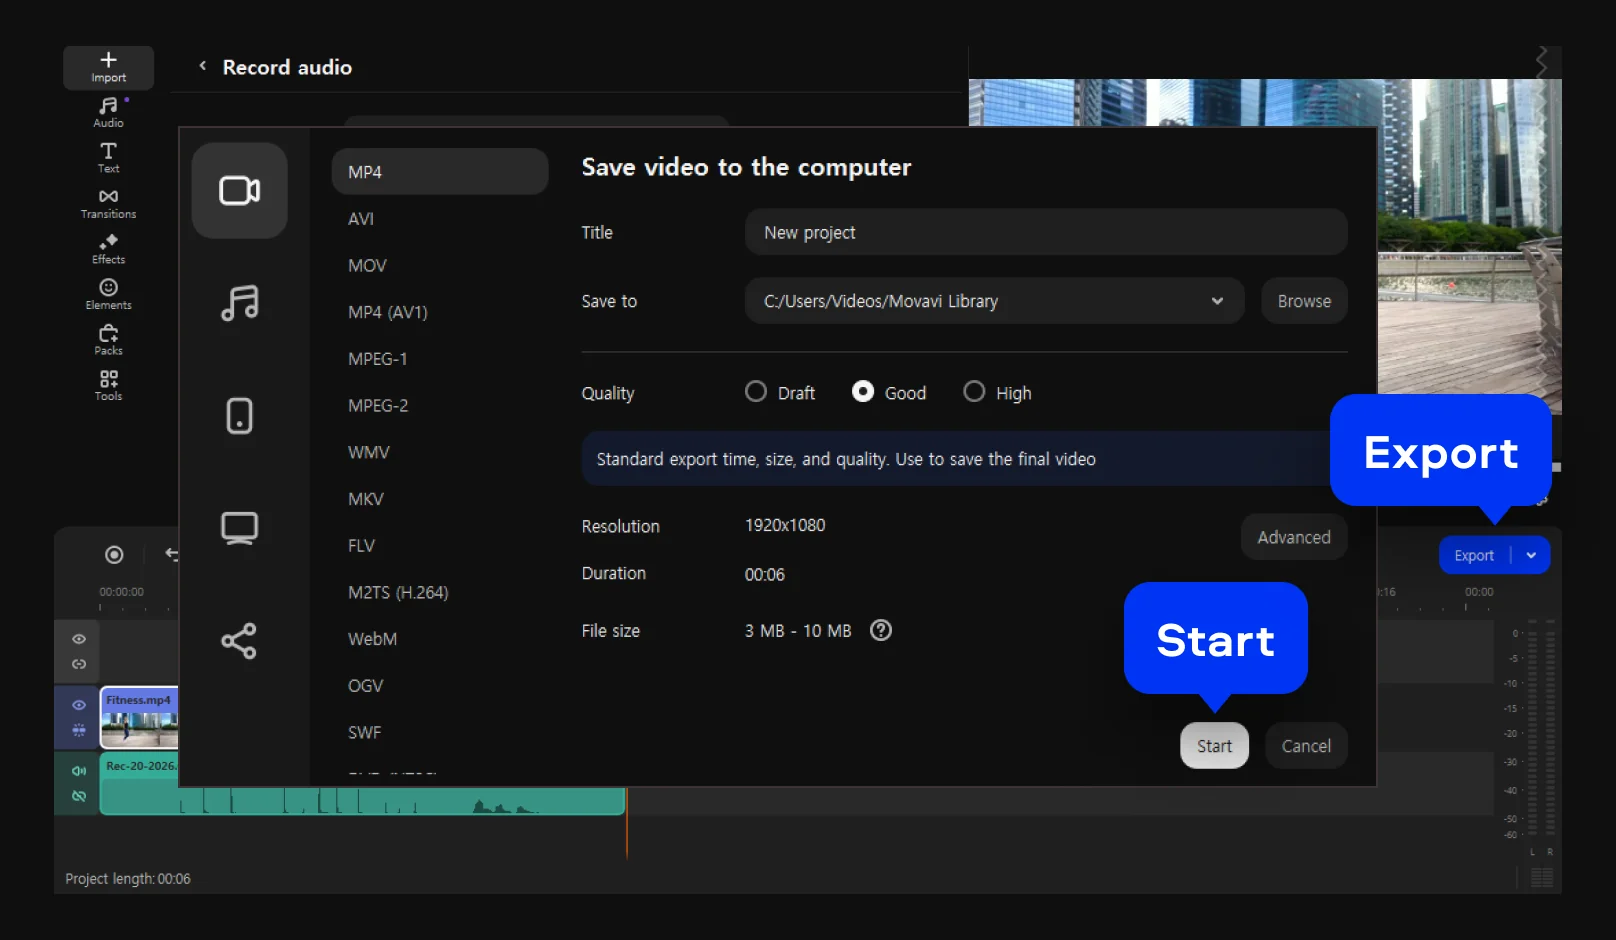
Teachers producing video lessons and course creators publishing on platforms like Udemy or Coursera add a voice-over to screen recordings, slide decks, and demonstration videos to explain what viewers are seeing. Movavi Video Editor lets them record narration directly against the footage, clean up room noise with the AI denoiser, and export the finished lesson in a format compatible with any LMS platform.

YouTubers and social media creators  ·  CONTENT CREATION

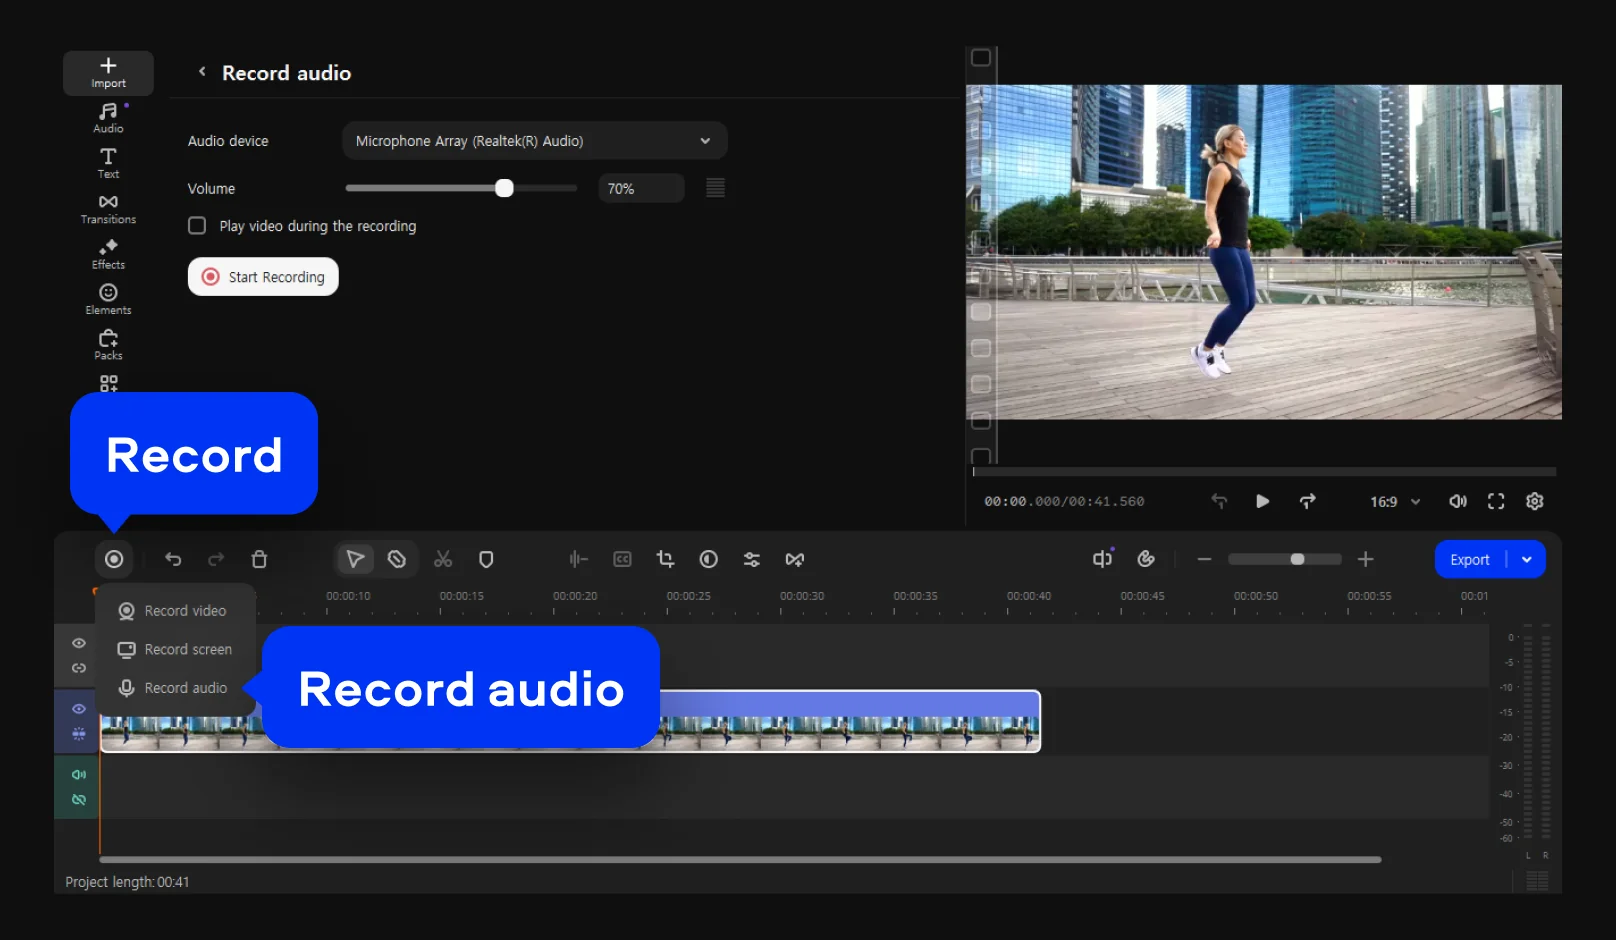
Creators who produce tutorials, product reviews, travel vlogs, and commentary videos use a voice-over to narrate footage shot without live audio – or to add a polished narration track on top of raw camera sound. Movavi's built-in recorder and timeline editing tools give them a complete video maker with a voice-over capability that handles the full production in one app, from recording to final MP4 export.

Corporate and marketing teams  ·  BUSINESS

Marketing teams producing explainer videos, product demos, and internal training content use a voice-over to add professional narration to animated graphics and screen-recorded presentations. Movavi's AI noise removal ensures recordings made in typical office environments – with background ventilation, keyboard sounds, and ambient noise – come out sounding clear and broadcast-ready without expensive studio time.

Frequently asked questions

Common questions about voice-over video editing, tools, and terminology.

How do I do a voice-over in a video?

To add a voice-over to a video using Movavi Video Editor:

  1. Download and install the app – it is free for Windows and Mac with a 7-day trial.
  2. Click Add Files and import the video you want to narrate, then drag it onto the Timeline.
  3. Click the Record button above the Timeline, select your microphone, set the input volume, and press Record audio. Speak your narration while watching the video play back – the voice track syncs automatically.
  4. When finished, stop recording. The voice-over track appears on an audio layer below the video.
  5. Trim any mistakes, adjust the volume, and apply Noise removal to clean up background noise.
  6. Click Export and save the finished video in MP4 or another format.

The entire process – from a raw clip to an exported narrated video – typically takes under fifteen minutes for a standard-length piece.

What is a voice-over on a video?

A voice-over on a video is an audio narration track recorded separately from the main camera audio and placed on top of the video during editing. The narrator speaks while the video plays, explaining, describing, or commenting on what the viewer sees – without appearing on screen. Voice-overs are used in documentaries (narrating context), tutorials (explaining steps), corporate videos (presenting information clearly), and online courses (teaching concepts alongside visuals). The key distinction is that a voice-over is recorded in post-production and laid over the existing footage, rather than being captured live on set with the camera. In video-editing software like Movavi Video Editor, the narration track appears as a separate audio layer on the timeline, independent of any audio that was originally recorded with the video.

How can I voice-over a video for free?

Several free software options let you add a voice-over to a video at no cost. Movavi Video Editor offers a free download with a 7-day trial that includes the full voice-over recording and editing toolkit – the only limitation is a watermark on exported files. iMovie is completely free and includes a narration recording feature. DaVinci Resolve has a full audio recording capability with more precision than most consumer editors. Clipchamp supports basic voice-over recording without installation. For a browser-based option, Kapwing and Canva both allow voice-over recording on their free tiers, though they impose file-size limits and add watermarks on free exports. For most creators who want a voice-over for videos on Windows or Mac with noise removal and full audio-editing tools included, the Movavi free trial is the most complete starting point.

Is it VO or VA?

Both abbreviations are used, but they refer to slightly different things. VO stands for voice-over – the narration track that is recorded and placed over existing video footage. It refers to the technique and the audio element itself. VA stands for voice actor – the person who performs the narration, character voices, or spoken content. In professional production, a VA records the VO. In everyday content creation, the same person often both writes and records their own voice-over for videos, so the distinction matters less. When someone asks for VO work, they typically mean the recorded audio track. When they refer to a VA, they mean the person performing it.

Join us for discounts, editing tips, and content ideas

1.5M+ users already subscribed to our newsletter

By signing up, I agree to receive marketing emails from Movavi and agree to Movavi's Privacy Policy.