Movavi Video Suite
*The trial version of Movavi Video Suite has the following restrictions: 7-day trial period, watermark on exported clips, 60-second video or 1/2 audio length limit, and/or some advanced features unavailable when exporting videos.
Use Movavi Video Suite to edit YouTube videos!
By clicking the download button, you're downloading a trial version of the program.*
Getting videos from iMovie to YouTube can feel tricky at first, but with a bit of guidance, the whole process can become a much more smooth ride. This guide is designed to walk through how to upload iMovie to YouTube step by step from importing your footage and editing like a pro, to exporting your final piece in the right format. It’s all about mastering the flow from project start to YouTube-ready finish, whichever device you are using.
Knowing how to work with Apple’s inbuilt video editing software properly can do more than simply improve video quality. It streamlines your creative workflow and gives your content that polished edge viewers tend to like. Editing is crucial for every type of video including comedy shorts or even a short documentary, understanding how it works helps boost your production game. So, if uploading an iMovie video to YouTube is on the to-do list, this guide covers every angle to make that process easy and effective.
This guide is perfect for those stepping into the world of content creation. Loads of people want to be YouTubers nowadays and we all have powerful video equipment in our pockets. Maybe it’s someone creating a project on a MacBook, or someone recording footage on an iPhone and transferring it to iMovie to polish it before you upload your video.
It’s also useful for digital creators who want their videos to look more professional without getting too technical. If video quality matters but tech jargon gets in the way, this guide breaks it down in plain terms. You might be editing a travel vlog or a cooking tutorial, this walkthrough helps turn any basic project into something more refined and YouTube-ready (or publishable on any other platform) using iMovie.
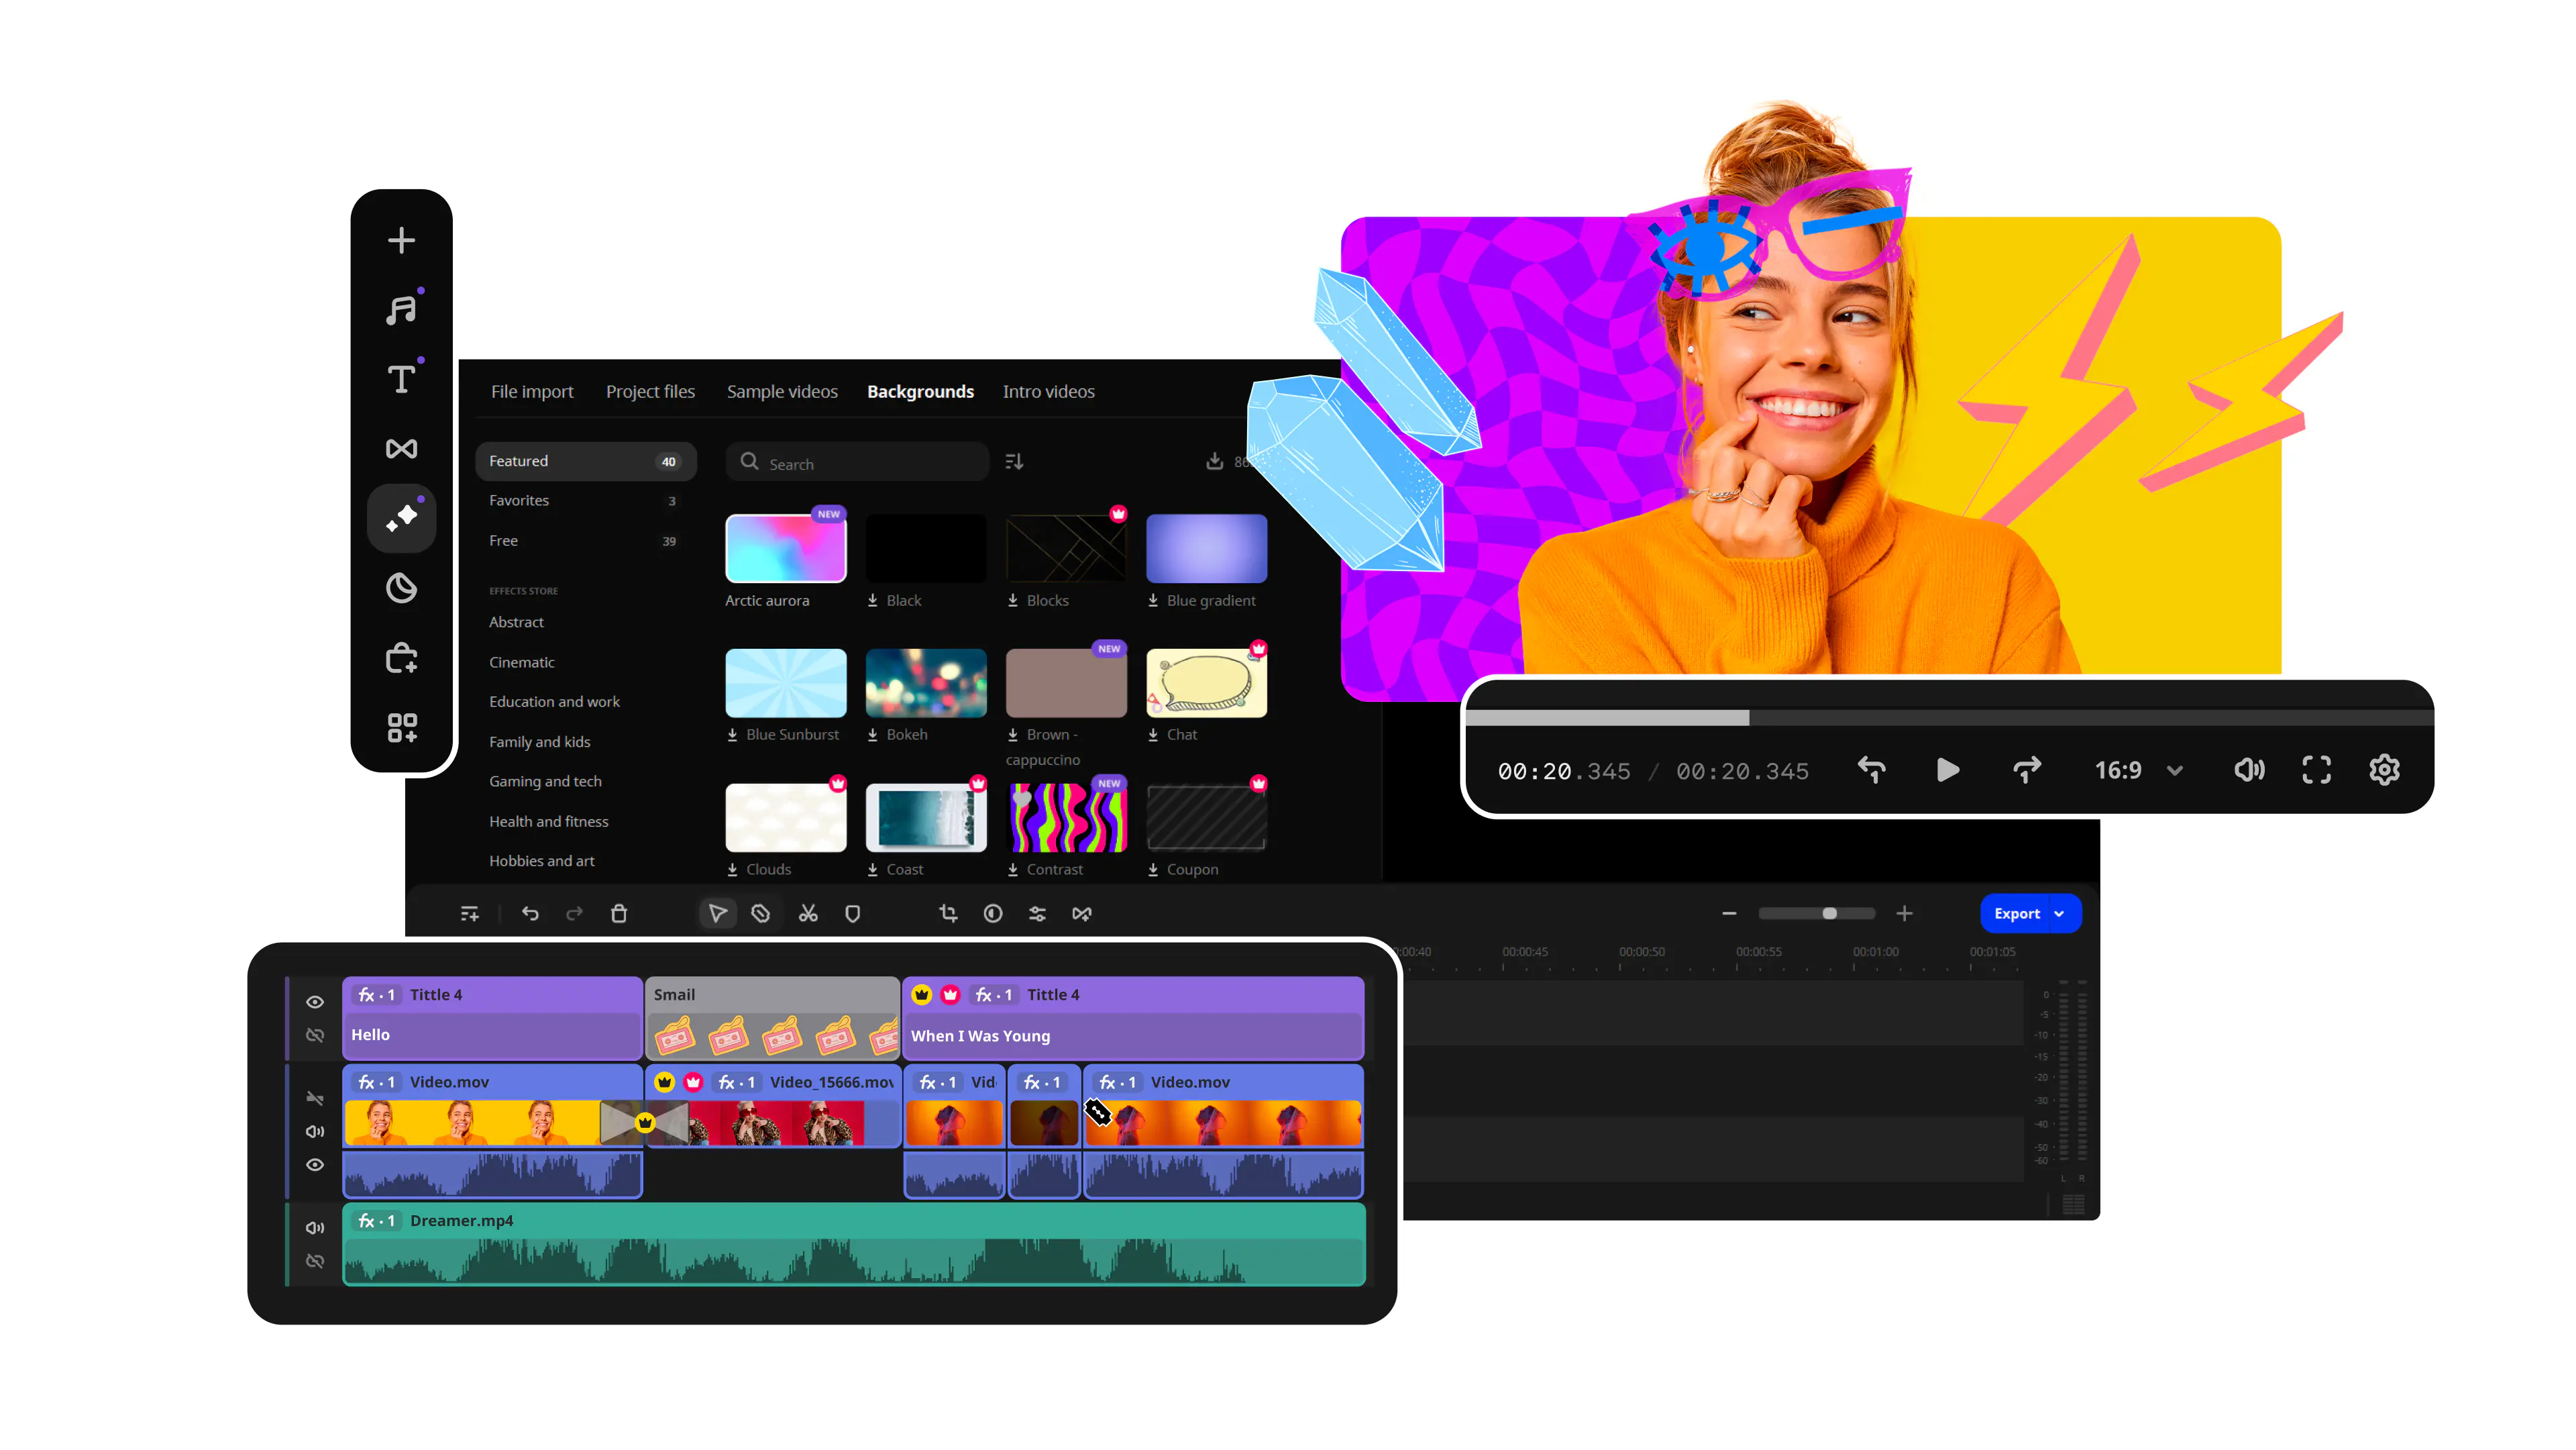
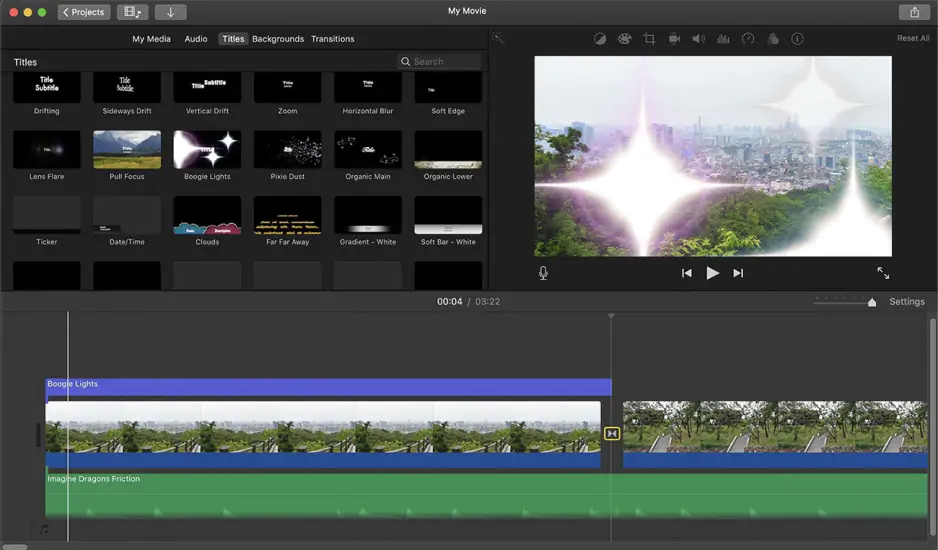
iMovie keeps things simple. The moment it opens then everything is right there: your project timeline sits at the bottom, preview window at the top right, and the media library on the top left. This layout makes it easy to drag clips around and drop in transitions with just a few clicks. You don’t need advanced editing knowledge to find your way around and the software supports multiple file formats.
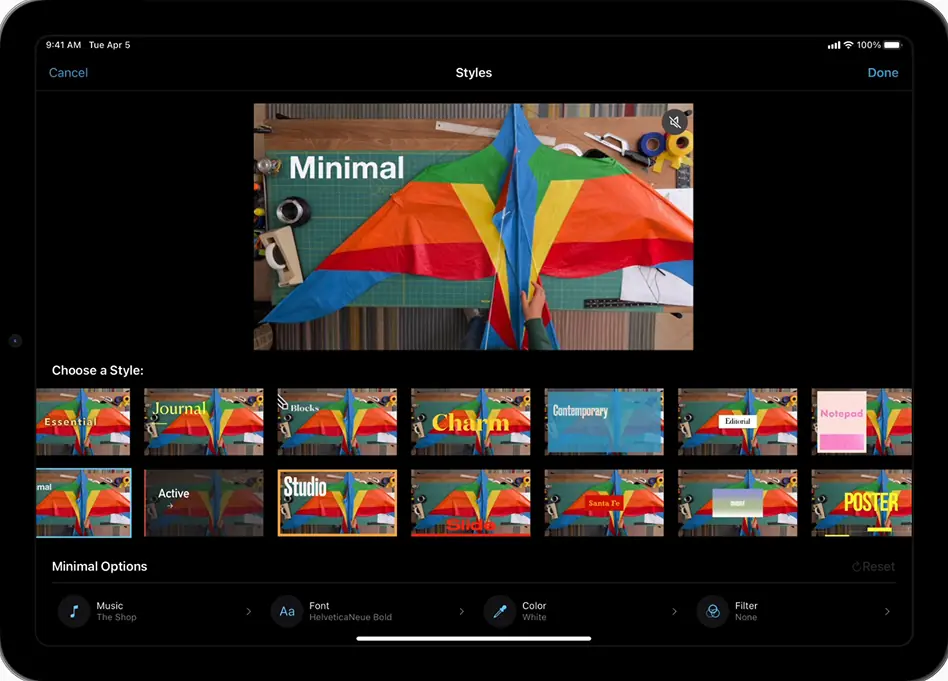
There’s also a built-in selection of video project templates that people can use to shorten the process. Other project options include adding sound effects and background music. The titles and effects menu lets creators add flair without overcomplicating the edit. One great feature for YouTube videos is the ability to create cutaway shots and picture-in-picture effects just like in professional movies, without needing third-party software.
Whether working from a Mac or syncing from iCloud, iMovie’s format support and intuitive screen layout make it a good fit for content creation without overwhelming the user. The fact that it comes free with Mac and other Apple devices is a big bonus.
Before diving into edits, a bit of planning goes a long way. A well-organized project saves time and reduces errors. Start by creating a dedicated folder for all assets. This means footage but also images and music. This keeps everything neat and avoids the last-minute scramble for missing files.
Consider sketching a basic storyboard. Even just a rough list of scenes to map out what happens and when is helpful. It helps guide editing decisions later. Choosing your project settings early on is also crucial. Make sure to set the right resolution from the beginning, especially if planning to export in HD or 4K for YouTube. There is no way of easily upscaling lower resolutions. Editing in the right size and the right project aspect ratio avoids stretched footage or fuzzy results. With organized assets and clear structure, editing becomes less chaotic and more enjoyable.
Without quality original assets and an organized project, it is not likely that people will be able to create a brilliant video. Asset organization and some simple planning should make the process easier and more effective.
Sometimes the plan for making a video includes referencing or reacting to existing YouTube content. While iMovie doesn’t allow direct YouTube importing, there are a few ways to bring those clips in.
YouTube downloaders. Use trusted video download tools (like 4K Video Downloader) to save the content locally. Then import it straight into iMovie from your computer’s media folder.
QuickTime screen recording. Open QuickTime Player on a Mac, start a screen recording, and play the YouTube video. Save the recording, then drop it into iMovie.
Browser extensions. Some Chrome or Safari extensions allow fast YouTube video downloading in a format that works with iMovie.
Online converters. Tools like ClipConverter or ZamZar let users paste a YouTube link and download the video in a usable format like MP4.
iMovie handles several formats, but not all files play nicely. MP4 and MOV are the most common and are fully compatible with iMovie. If a file doesn't import or causes errors, it probably needs converting first (luckily, this isn’t a tough process).
Using tools like HandBrake and Movavi Video Converter can solve most format issues. These tools let users convert AVI, MKV, or WMV files into MP4 or MOV with minimal quality loss. It's a quick fix and can save a lot of time in the long run.
Here’s a simple comparison table to help understand format compatibility:
Once everything is in place, editing becomes the stage where things really come together. iMovie’s tools make the process smooth and manageable, even for beginners. Start by trimming clips to cut out any rough edges or awkward pauses. Drag the ends of each clip in the timeline to shorten or extend scenes. Add transitions between clips to help the video flow better. This might include fades and cross-dissolves which can work well without distracting from the content (don’t go over the top, or people will notice).
Try layering in titles and visual effects where they make sense. Overlays can highlight key moments or add personality. Keep the pacing in mind, especially for YouTube as videos that jump too slowly between scenes can lose viewers but poor editing that is too fast can also be off putting.
Editing tips:
Keep transitions smooth and subtle
Trim clips for better timing and flow
Use titles to guide viewers or introduce segments and provide more information
Apply fade-ins and fade-outs for a polished feel
Preview often to check pacing and audio balance
Audio can make or break a video. Lots of us have watched videos where the audio seems too loud or too quiet, or worse, keeps changing! iMovie offers tools to adjust sound levels and blend background music without overpowering dialogue. Fade effects help audio come in or leave gently, avoiding harsh cuts. Just select the clip, then drag the fade handles at the beginning or end to create a smooth transition.
Inside the Audio Inspector, volume adjustments and other effects like noise reduction and equalizer settings help improve clarity. When music runs too long or needs cutting, use clip trimming. Split the audio track where necessary and remove extra sections. For a more impressive sound mix it is important to balance music with voice clips. Layering background audio at a lower level under dialogue also makes everything on screen feel more professional and it means people can actually hear what is going on.
Once editing wraps up, it’s time to export. The goal is to keep the quality high and the file format compatible. iMovie’s export settings make this simple. Click the Share icon and select File. From there, choose your resolution. 1080p has become a minimum video resolution expectation for YouTube, though using a 4K video file is available too if shot with a high enough resolution.
File formats matter. MP4 is the go-to movie file choice since it’s supported across all platforms. MOV is also compatible but can be larger in size. Compression quality can be set to High or Best, depending on internet speed and upload limits.
Export checklist:
Click File under the Share button.
Select the resolution (1080p or 4K).
Choose the format: MP4 preferred.
Set the quality to High or Best.
Click Save and check the file before uploading.
Sometimes things go off track. Export errors such as unexpected file sizes or playback glitches aren’t unusual.
If the file ends up too large, try lowering the quality setting slightly or compressing the file using a third-party tool like HandBrake. It is possible that you are exporting at incredibly high qualities that might take forever to upload.
Slow upload speeds can also frustrate users so closing background apps and ensuring a strong internet connection can help. If playback quality seems off on YouTube, it may just be processing. Give it time before making any drastic changes.
If the audio goes out of sync, recheck the timeline or export again with a different quality setting. It is also possible that the audio and video have become unlinked and are therefore not playing at the right time.
Once the video reaches YouTube there are further steps. Metadata like titles, tags, and descriptions help get content noticed. The title should be catchy but relevant. The description can include links and hashtags. It should also have a clear summary of the content. Tags should match the topic, helping the algorithm place the video in front of the right audience.
Thumbnails also matter. A well-designed thumbnail can double the click rate. Use high-quality images with clear text or engaging visuals.
Longer videos need extra steps. YouTube requires account verification to upload videos over 15 minutes. Visit YouTube Studio, click Verify, and follow the prompts. It’s quick and only needs a phone number. Longer videos may also take more time to export and upload, so higher upload speeds make a difference.
Best practices:
Verify YouTube account before uploading.
Stick to 1080p if you want to avoid long upload times.
Break content into chapters for better navigation.
Keep pacing tight. A long video length doesn’t have to mean slow footage.
Uploading straight from an iPhone device is simple with iMovie mobile. Once the project is done:
Tap Share in iMovie.
Select YouTube.
Sign in to your YouTube account.
Choose resolution and privacy settings.
Add a title and description.
Tap Upload.
If exporting to a computer first, save the file in Photos Library or Files and upload via YouTube’s desktop platform for more control.
Some problems show up more often than others. You can fix audio glitches by checking your clip volumes or reapplying fade effects.
Export delays can be caused by low disk space so clean up unused files to speed things up. If upload fails, try renaming the file or restarting the browser. Most bugs are fixable with a bit of patience and there is a big community of people using iMovie who can help come up with a solution and assist with your troubleshooting.
Creating a great video in iMovie and uploading it to YouTube isn’t complicated once the steps are clear. Start with a solid plan and organize your videos first, before you even start.
Next, optimize audio and visuals, export in the right format, and finally upload with strong metadata and good presentation. Following this flow ensures a quality end product that stands out and looks professional.
Key takeaways:
Plan and organize before editing
Export in MP4 with high video resolution so the video looks good
Add effective titles, tags, and thumbnails
Troubleshoot common issues if needed
There are a lot of resources out there for those who need further help or want to improve their iMovie skills. If you want to create a YouTube channel that is successful then quality is essential. Feel free to share videos and advice in the comments section to discuss your requirements.
If you need further advice, iMovie has a specific forum that you can access on Apple’s own website. A lot of people then graduate to Final Cut Pro which is also Apple video-editing software and provides other advanced options for people to edit and create impressive videos. There are also a number of YouTubers who share their tips on how to create a top video and edit using iMovie. iMovie is so popular that tutorials are far from uncommon.
Movavi Video Suite
*The trial version of Movavi Video Suite has the following restrictions: 7-day trial period, watermark on exported clips, 60-second video or 1/2 audio length limit, and/or some advanced features unavailable when exporting videos.
Have questions?
Join us for discounts, editing tips, and content ideas
1.5M+ users already subscribed to our newsletter