How to Speed Up or Slow Down a Video in iMovie: Step-by-Step Guide

Use Movavi Video Editor to easily change video speed!

  • Trim, cut, crop, and rotate videos
  • Add titles, stickers, and transitions
  • Apply visual effects

By clicking the download button, you're downloading a trial version of the program.*

Edited by Ben Jacklin
7,010

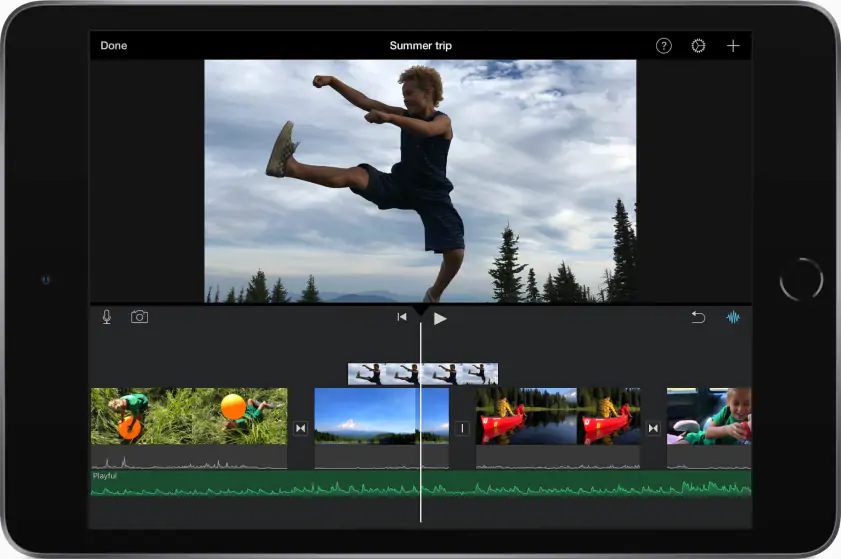
Crafting an action-packed montage or setting the mood for a reflective vlog? Knowing how to speed up a video in iMovie can make the difference between flat footage and cinematic flow. 

iMovie gives both beginners and seasoned editors simple but powerful tools to tweak the tempo of any video clip, helping you sync moments with music, create dramatic pauses, or compress hours into seconds. 

If you’ve ever wondered how to slow down videos in iMovie without losing quality, this guide walks you through it, step by step. From fine-tuning scenes for emotional punch to mastering timing for storytelling, we’ll show you how to control your video’s pace like a pro. Whether you're experimenting with casual video editing or polishing up a serious project, this is where dynamic editing begins.

Understanding iMovie’s speed controls

Want to make your scenes hit harder or linger longer? Before you can truly master timing, you need to know how iMovie handles speed controls. This section breaks down the built-in tools for changing video speed and how they empower every edit.

Overview of iMovie speed adjustment features

Inside the iMovie app, adjusting clip speed is as easy as sliding a dial. The speed adjustment process starts with selecting your clip in the timeline, then clicking the speed button – a little gauge icon on the toolbar. 

From there, the speed slider lets you fine-tune the playback tempo. Do this when you’re figuring out how to speed up a video in iMovie or gently ease it into a slower pace. 

There are also options like Preserve Pitch to keep audio from sounding distorted when you tweak speed. Simple controls, big results. This can also do wonders when you're shaving off dead space or setting up an intense time-lapse. Remember that iMovie's tools are straightforward and beginner-friendly, but flexible enough for pro-level cuts.

Benefits of speeding up and slowing down a video in iMovie

Learning to slow down a video in iMovie can completely shift the tone of your edit. A simple adjustment can highlight emotion, build suspense, or inject momentum into your storytelling. 

Slow motion video sequences add gravitas or dreamy nostalgia, while fast cuts can energize montages or tighten pacing for modern, snappy delivery. 

When you adjust video speed deliberately, you’re not just trimming or stretching time – you’re shaping viewer perception. For creators chasing a punchier or more immersive final product, mastering these subtle changes can unlock whole new layers of depth.

How to speed up a video in iMovie on a Mac

Speeding things up in post-production can turn a simple video file into something punchy and professional. iMovie’s intuitive speed tools work seamlessly on a Mac, and thanks to iCloud, switching between multiple Apple devices is just as smooth.

Importing videos and setting up your project

To speed up a video in iMovie, start by launching the iMovie app and clicking Create New > Movie to begin a new project. You’ll then land in the iMovie window, where you can click the Import Media button to bring in your video file. 

Choose your file from Finder, then drag it onto the timeline. If you're working across multiple Apple devices, iCloud integration makes it easy to pull clips in from your iPhone or iPad. Once your timeline is set, you’re ready to apply iMovie’s playback tools.

Mastering the Speed slider and presets

Once your clip is in the timeline, click the Speed button (it looks like a little gauge). In the settings above the preview window, you’ll see a speed slider appear. To adjust playback tempo, simply drag the speed slider to the right to go faster. iMovie also offers preset options like 2x or 4x for instant speed boosts. As you experiment with the desired speed, preview your results directly in the preview window before finalizing.

Fast-forward effects, tighter cuts, or simply cleaning up dead space, this is the core of what speed-up videos in iMovie is designed to simplify.

Preserving audio pitch while speeding up

When increasing clip speed, audio often becomes high-pitched and unnatural. iMovie solves this with the Preserve Pitch checkbox – an option that ensures your original audio keeps its natural tone even as the visuals fly by. To activate it, just tick the checkbox in the speed control panel after selecting your clip. 

This is especially important for dialogue-heavy scenes or clips where sound design matters. Keeping voices crisp and consistent is just as vital as pacing when it comes to a polished edit.

How to speed up a video in iMovie on iOS

Using your iPhone or iPad to edit on the go? The iMovie app for iOS devices offers much of the same power as its desktop sibling – just in a more compact interface. Here’s how to use its speed tools.

Creating and setting up a new project on your iPhone/iPad

Launch the iMovie app, tap the plus (+) icon, and choose Movie to begin editing. This sets up your new project, ready for you to import footage and start adjusting speed. iOS will instantly drop it into the timeline, giving you quick access to trimming, filters, and most importantly, speed controls. 

Navigation on iOS devices is touch-based, so everything from cutting clips to adjusting playback is intuitive and gesture-driven. Once the clip is loaded, you're set to speed up video iMovie style using just a few taps.

Adjusting video speed in the iMovie app

Tap the clip in the timeline to bring up the editing tools, then locate the speed control – represented by a speedometer icon. This opens the speed pop-up menu, where a slider appears just beneath your selected clip. 

To speed up playback, simply drag the slider to the right. You can preview the results in real time, making it easy to test timing before finalizing your cut. If you're learning how to speed up a video in iMovie on mobile, this is the essential tool that keeps everything fast and fluid – without needing a desktop.

How to slow down a video in iMovie

Timing is everything in storytelling, and slowing down your footage can add weight, tension, or emotional depth to your edits. iMovie offers user-friendly speed tools that let you control the pace of your scenes with just a few clicks or taps.

Step-by-step guide to slow down clips

To slow down a video in iMovie properly, begin by selecting your clip from the timeline. Once it’s highlighted, open the speed controls via the speedometer icon. It will reveal the speed adjustment slider. To reduce playback tempo, drag the slider to the left – this will instantly change the speed of your clip. If you're aiming for dramatic timing, enable the slow motion video option to dial in a specific percentage. 

The added precision makes a big difference when editing action shots, dialogue sequences, or emotional beats. Once you’ve fine-tuned the clip, preview your adjustments and lock in the final version.

Exploring creative effects: Reverse and slow motion

Creative pacing doesn’t end at basic slowdown. iMovie lets you pair slow down techniques with reverse playback for surreal, suspenseful, or even funny moments. Another trick is inserting a freeze frame to spotlight a reaction or detail, followed by a shift in speed to maintain flow. 

Small speed changes can reshape how scenes land with your audience. You’re not just cutting clips, you’re crafting altered video that guides the viewer’s attention and emotion from beat to beat.

Advanced tips and common mistakes

Once you’ve got the basics down, refining your edits means working smarter within the timeline; and avoiding pitfalls that can throw your pacing off. This section is packed with pro-level tweaks and practical fixes for speed editing inside iMovie.

Splitting clips for selective speed adjustments

Want to apply speed changes to just one moment in your footage? Start by selecting the clip in the timeline and using the R key to highlight a portion of it. It’ll let you isolate a selected clip segment without affecting the rest of your edit. 

Now, drag the slider to adjust the playback speed just for that part. It’s an effective way to spotlight key reactions, emphasize dramatic pauses, or create quick cuts within a single take. Splitting your clips this way gives you tighter control over flow without needing to chop the entire video apart.

Troubleshooting speed adjustments in iMovie

Speed tools in iMovie are simple – but occasional hiccups can still trip you up. Here’s how to handle the most common ones:

  • Speed change doesn’t apply: make sure the video editing panel is active and that you’ve selected the clip directly.

  • Audio sounds choppy: use the Preserve Pitch checkbox to clean it up.

  • Speed controls greyed out: ensure the clip isn’t part of a transition or trailer template.

  • Effects disappear after speed change: reapply filters after adjusting the speed.

Alternative tools and resources

For those who want more features or faster exports, there are plenty of third party apps that go beyond iMovie’s built-in tools. Social media users often turn to programs with advanced filters, templates, and export options. If you’re after an excellent video editor that supports multiple formats and pro-level transitions, here’s a quick reference:

Software

Platform

Notable features

Movavi Video Editor

Mac/Windows

AI background removal, keyframe animation

CapCut

iOS/Android

Trendy templates, auto-captions

Filmora

Mac/Windows

Motion tracking, stock asset library

Adobe® Premiere® Rush

All

Cloud sync, direct social export

Conclusion

Speed isn’t just a technical tweak – it’s a storytelling tool. From dramatic slow motion to quick cuts that match a beat, knowing how to adjust timing gives your video editing far more impact. iMovie makes it simple to fine-tune clips, experiment with speed changes, and even create effects worthy of a Final Cut. 

Movavi Video Editor

Create awesome videos easily

*The free version of Movavi Video Editor may have the following restrictions depending on the build: watermark on exported clips, 60-second video or 1/2 audio length limit, and/or some advanced features unavailable when exporting videos.

Movavi Video Editor

Frequently asked questions

Is there a way to speed up a video in iMovie?

Absolutely. If you're wondering how to speed up a video in iMovie, just select the clip, open the speed controls via the speedometer icon, and drag the slider to the right. You’ll find full instructions in the Mac and iOS sections above.

How do I speed up a video on an iPhone without iMovie?

You can use third party apps like CapCut or InShot to edit a new video directly on your iPhone. Just import the clip, locate the speed controls, and adjust playback – no iMovie needed.

How do I increase the speed of a video?

Most video-editing apps include a speed option in the clip settings. Simply select your footage and look for Speed or Playback Rate to increase speed for fast-forward effects or tighter pacing.

How do I speed up a video on iPhone camera roll?

To apply changes directly from your camera roll, open the video in the Photos app, tap Edit, then choose speed options if available. For more control, export the clip to iMovie and follow the steps on how to speed up a video in iMovie using the mobile timeline.

Have questions?

Have questions?

If you can’t find the answer to your question, please feel free to contact our Support Team.

Join us for discounts, editing tips, and content ideas

1.5M+ users already subscribed to our newsletter

By signing up, I agree to receive marketing emails from Movavi and agree to Movavi's Privacy Policy.