How to Trim in iMovie: Essential Trimming & Cutting Techniques

Trim your videos quickly and easily with Movavi Video Editor!

  • Trim, cut, crop, and rotate videos
  • Add titles, stickers, and transitions
  • Apply visual effects

By clicking the download button, you're downloading a trial version of the program.*

Edited by Ben Jacklin
5,708

You’ve filmed your video. It’s all imported into iMovie. What next? Now you need to learn how to trim in iMovie. Fortunately, trimming in iMovie is straightforward. In fact, one of iMovie’s biggest draws is how intuitive the basic editing tools are. That includes trimming and cutting.

Trim in iMovie

Article overview and key takeaways

We’ll cover the ins and outs of trimming, cutting and splitting. You can perform these actions on both video and audio clips.

These skills are absolutely essential for editing videos. Whether you’re an amateur filmmaker editing as a hobby, a content creator looking to upgrade your social media feed, or a professional looking to sharpen your iMovie chops, you’ll need to be fluent in all three of these basic editing skills. 

Key takeaways

  • You can trim clips in iMovie with either the built-in editor or precision editor.

  • The built-in editor lets you trim by dragging yellow handles on either side of a clip. In the precision editor, you can edit to the exact frame.

  • Editing in iMovie for iPhone or iPad is similar, but optimized for touch controls.

  • Additional tools and tips can help you refine and perfect your editing workflow.

Understanding iMovie’s editing tools

Overview of iMovie’s built-in video editor for trimming in iMovie

When it comes to trimming, iMovie’s basic, built-in tool is about as good as it gets. You can learn how to use it in minutes. And once you do, you can trim clips in just a few clicks. 

iMovie’s trimming tool is built around the drag-and-drop function. All you need to do is drag your clip onto the timeline, and drop it in there. Next, you drag either end of the clip to trim it to your desired length, and drop it in place to confirm the edit. Simple!

Let’s go over that process step-by-step:

  1. Open iMovie and start a new project. (Or open an existing one, if you’ve already begun work on your masterpiece!)

  2. Drag your video clip and drop it onto the timeline, which should be located on the bottom half of your screen. Your clip should appear on the timeline as a rectangle.

  3. The length of your clip is reflected in how long it appears on the timeline. If you’ve dropped the clip at the beginning of the timeline, and it’s ten seconds long, it will occupy the space between 0 and 10 seconds on the timeline.

  4. Click on the clip in the timeline to activate it. It’ll now be ready for editing.

  5. Move your mouse to the side of the clip you wish to edit. If you want to trim off some of the end, for example, move your mouse to the end of the clip, which is the right-hand side.

  6. Your cursor should change to a small bracket. That’s the symbol for trimming.

  7. Click and drag inward to trim your clip. Let go when you are satisfied.

  8. Your clip in iMovie will now be precisely trimmed. Voila! 

The same process is used to trim audio clips.

Exploring the precision editor for advanced trimming in iMovie

That straightforward trimming process is great, but what if you want something even more precise? If you’re a professional editor, for example, you might be looking to trim a single frame off the end of your video clip or audio clip.

And why not? After all, you want your art to be perfect. Luckily, iMovie has additional advanced trimming options for this exact purpose.

Clip trimmer

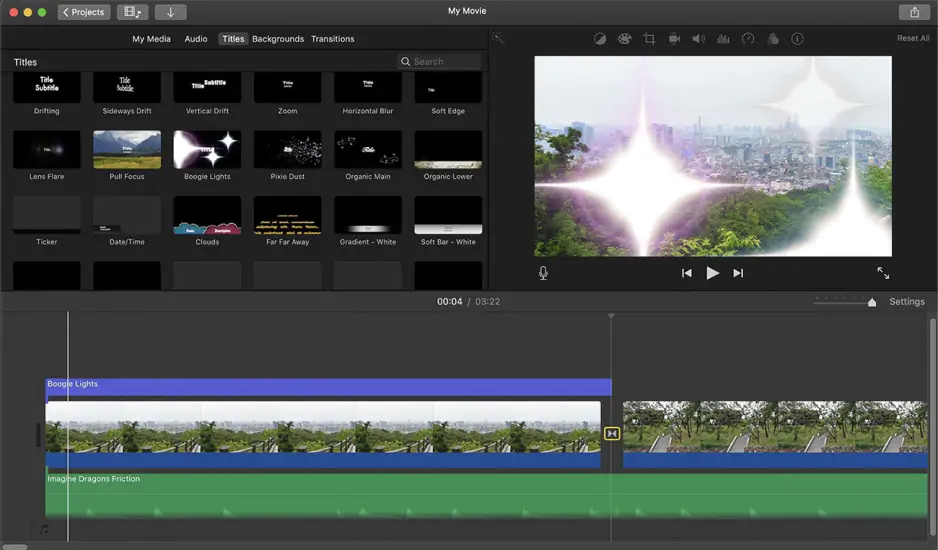
After you’ve clicked on the clip you want to edit, you can open the Clip Trimmer tool to perform precise edits. Do this by opening the Window submenu in the header menu at the top of your screen. Then click Show Clip Trimmer.

This will open the Clip Trimmer on your timeline. You can now perform two trim-based edits:

  1. Click and drag on either end of the clip to adjust its timing. This is the same idea as the basic trim tool, just on a frame-perfect scale.

  2. Click on the middle of the clip and drag it to the left or right to adjust when it starts and ends. This will keep the length of the clip the same.

  3. When you’re done, hit the enter/return key to save your edits. 

Precision editor

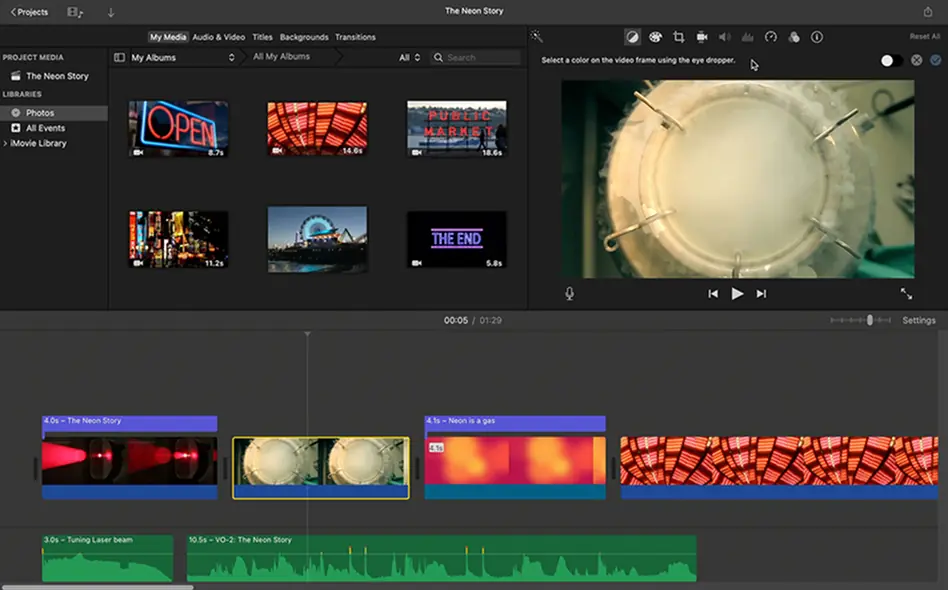
For even more precise edits, open the precision editor. You can activate this by clicking on the edge of a clip in your timeline, and then clicking Show Precision Editor in the Window submenu.

This will open the precision editor. You’ll see two clips. On top is the first clip, and underneath is the second. The point at which the first clip transitions to the second is shown by a grey bar in between the two. You can click and drag this to edit the transition between the clips. 

It also lets you edit the audio of each clip. For example, you can have the audio of the first clip keep playing after the second clip begins.

How to trim in iMovie on a Mac

Importing and preparing your video

Before we can start trimming our clips, we need to get them into iMovie. There are two ways you can do this. 

The first method is a simple drag-and-drop. Open Finder and locate your video clips. Select them and drag them into iMovie. They’ll be imported into an “event,” which is basically a folder.

If you’re importing content from an external storage device, or you’re opposed to dragging and dropping, try using the Import window. You should see the Import button in your iMovie toolbar. It’s represented by a downward-facing arrow. If you can’t see it, try clicking the Media button, also in the toolbar, to access the Import button. 

This will open the Import window. Open the device you wish to import your media from, then select the clips you want to import. 

The benefit of using the Import window is its ability to sort through media. You can sort all of your clips by different factors, like when they were created or how long they are. The window also lets you preview clips to confirm they are actually what you’re looking for.

Before you import, make sure you’re importing to the right place. Do that by clicking the Import to menu and choosing the appropriate event. If you don’t have an event yet, create a new one. 

Step-by-step trimming and splitting process

Once your clips are imported, you need to drag them onto the timeline. Then they’ll be ready for editing. 

We’ve already covered how to trim. Remember, you simply need to move your mouse to the right edge or left edge of your clip, and then drag and drop. 

But what if you want to split your clip into two?

Unsurprisingly, that’s called splitting. It’s also very simple. First, move the playhead to the point at which you want to split your clip. Then click Modify, then Split Clip.

Best practices and shortcuts for cutting in iMovie on a Mac

All this is well and good, but we want to get you trimming and splitting as fast as possible. That’s why iMovie has built-in shortcuts for all of these edits. 

There are keyboard shortcut commands that activate the clip trimmer, splitter, and more.

Here are some of the most important:

  • Trim: once you’ve highlighted part of a clip, hit Option + Slash to trim the clip to your selection.

  • Split: once you’ve moved your playhead to the point you wish to split your clip, hit Command + B.

  • Open/close the precision editor: hit Command-Slash.

  • Open/close the clip trimmer: after selecting your clip, hit Command-Backslash.

  • Detach audio from a clip: hit Option+ Command + B. This lets you edit the audio separately from the video.

How to trim in iMovie on an iPhone & iPad

Navigating the iMovie interface on mobile

The mobile iMovie app is just as powerful as the desktop version in many ways. However, it’s optimized for your iPhone or iPad’s touch-based interface. Instead of clicking with a mouse or trackpad, you use your fingers to tap and drag. 

Adding content, for example, is similar to iMovie for a Mac. You can’t drag clips into iMovie for an iPhone or iPad, but you can use the mobile equivalent of the Import window by clicking the Add button. It looks like a plus sign. 

You can also record videos directly into your iMovie app by tapping Take Video or Photo after tapping the Add button.

Detailed steps for cutting and splitting clips on mobile

To trim a clip, touch it to activate it. Then tap and drag on the yellow trim handle, located on either side of the clip, to your preference. That’s it!

To split a clip, position the playhead and then click the button with the scissors icon. You can also use the touch interface as a shortcut. Simply swipe down on the playhead. Imagine you’re literally splitting the clip with your swipe.

Optimizing mobile workflow for high-quality edits

There are several ways to optimize your mobile editing workflow to trim in iMovie. Consider the following:

  • Plan ahead: try to sketch out the edits you’re going to make before starting your project in iMovie.

  • Import what’s necessary: don’t just throw all your clips into iMovie. Eliminate duplicates, for example, to save yourself time down the line.

  • Work in stages: start by doing a rough edit, where you don’t worry too much about precise trims and cuts. Once you’ve finished that, go back and refine each transition.

  • Learn shortcuts: take advantage of the touch interface to trim, cut, split, and more efficiently.

Advanced techniques and audio editing in iMovie

Refining cuts with the precision editor for superior results

Learning how to trim in iMovie at the frame-by-frame level is crucial for achieving a truly professional, seamless edit. 

On iMovie for an iPad, you can open the precision editor by tapping a transition icon between video clips and then tapping the yellow arrows that appear next to the icon. The shortcut for this is pinching open vertically on the transition icon. 

You’ll see a similar view to the precision editor on Mac. The first clip will be on top of the second, with the transition visualized in between. 

Tap and drag on the yellow handles to adjust the timing of the transition. Once you’re satisfied, either tap the yellow arrows or pinch close to save your changes and close the precision editor. 

How to cut audio in iMovie: Trimming music and sound effects

Editing audio in iMovie involves a similar process to editing video. Import your audio clip or music clip by dragging and dropping or using the Import window. Trim an audio clip by dragging either edge, and use the split tool to cut a clip at a specific point.

Ensuring your sound is properly synchronized to the video is important, especially if you’re adding audio elements in post.

Integrating third-party tools for enhanced editing

When learning how to trim in iMovie or how to cut in iMovie, you might be surprised to learn you might want more applications than iMovie itself. While iMovie is remarkably capable for a free app, there are plenty of third-party tools that can further enhance your editing.

Note that these are apps you can use alongside iMovie, rather than plugins, which generally iMovie doesn’t support.

Here are just a few you might want to consider:

App

Key features

HitPaw

  • Convert files quickly
  • Process in batches

HandBreak

  • Compress files
  • Open-source

Keynote

  • Add transitions to clips

Color.io

  • AI-powered color grading

Fotor

  • AI-powered enhancements

Common pitfalls and troubleshooting

Common mistakes when trimming in iMovie

Learning how to trim in iMovie isn’t always sunshine and rainbows. You might make mistakes, and that’s OK. After all, mistakes are often the best learning opportunities.

Here are a few common mistakes to watch out for:

  • Imprecision: try and make each cut as precise as possible, so no clips are too long or short.

  • Jarring transitions: perhaps your transitions are overloaded with effects. Or maybe you cut a clip in an awkward moment.

  • Ignoring audio: remember, audio is vital to good editing.

  • Too much: you might be tempted to cut, cut, cut, but don’t go too far.

  • Be careful: few things are worse than iMovie crashing and losing all your hard work. Save and export regularly.

Troubleshooting tips

Sometimes, it's not you making a mistake – it’s iMovie. Let’s discuss a few possible technical issues and potential solutions.

  • Clips jumping around: you might find it difficult to place clips where you want on the timeline. Zoom in for more precision. Check the Snap to Timeline option is enabled.

  • Can’t edit: if you can’t see the yellow handles for trimming, try clicking on the clip to enable it for editing.

  • Out of sync: sometimes, an audio clip might become unsynced from the video. Detach the audio clip, reposition it, then reattach it to the video clip.

  • Running poorly: you might find iMovie performs better when your laptop has sufficient free space.

Comparative analysis and best practices

Comparison of built-in vs. precision editor for trimming in iMovie

There’s a reason iMovie has two editing options. It’s because both are the best option in different scenarios. 

The built-in tool is all about efficiency. With a few clicks you can edit a clip. A whole project might take minutes. Meanwhile, the precision tool gives you granular control over your editing.

Tool

Strengths

Limitations

Built-in editor

  • Easy to learn and use
  • Quick to use
  • Less accurate
  • Hard to fine-tune
  • Can miss frames

Precision editor

  • Frame-perfect precision
  • Steeper learning curve
  • Takes longer to edit

Expert tips and recommended workflows for cutting in iMovie

If you watch an expert editor work, you’ll likely be impressed with their speed and efficiency. Some of that comes with practice. But there are some things you can try to improve your editing workflow.

  • Learn the keyboard shortcuts

  • Organize all of the media you’ll use into folders

  • Preview often to make sure everything looks good

  • Regularly delete unneeded media to keep things organized

  • Detach audio to make sure everything’s exactly in place

Conclusion

Recap and final thoughts

Hopefully you now have a better idea of how to trim in iMovie. The best way to improve now is by trying these techniques out for yourself. Remember, you can always come back and review if you need.

Know anyone who could use these tips? Send this guide to them and help them level up their iMovie editing.

Movavi Video Editor

Create awesome videos easily

*The free version of Movavi Video Editor may have the following restrictions depending on the build: watermark on exported clips, 60-second video or 1/2 audio length limit, and/or some advanced features unavailable when exporting videos.

Movavi Video Editor

Frequently asked questions

How do you trim a clip in iMovie?

Once the clip is in your timeline, click it to ready it for editing. Drag the yellow handles on either side to adjust where the clip starts and ends. Or open the precision trimmer for frame-perfect edits.

How do I crop part of a video in iMovie?

Where clipping edits the duration and timing of a video clip, cropping adjusts the portion of the video visible in the final edit. In iMovie, cropping is done with the Cropping button. Clicking this will apply a frame over your clip. Adjust this frame to highlight what you want to keep in frame.

How do I cut out parts of a video in iMovie on an iPhone?

Remember, iMovie on an iPhone has a toolset optimized for touch controls. As on a Mac, import a video clip to your timeline and tap it to select it. To trim, drag and drop the yellow handles on either end. If you want to cut, drag the playhead to where you want to apply the cut, and then tap the Split option.

How do you delete part of a clip in iMovie?

Deleting a clip in iMovie can be done via trimming or splitting. Select the clip and drag the yellow handles on either side to cut unwanted parts. Or position the playhead to where you want, then click and select Split. You can then delete the new, separated, unwanted clip.

Have questions?

Have questions?

If you can’t find the answer to your question, please feel free to contact our Support Team.

Join us for discounts, editing tips, and content ideas

1.5M+ users already subscribed to our newsletter

By signing up, I agree to receive marketing emails from Movavi and agree to Movavi's Privacy Policy.